
Regularly backing up your PC is always a good idea, whether you accidentally delete a file or lose a lot of your data due to a hard drive crash. Both Windows and Mac have excellent built-in backup applications, so getting started is simple. Here’s how to backup PC to an External hard drive for Windows and Mac PC.
How to Backup Windows PC External Hard Drive
Before you get started, get a backup drive. You can any use USB external hard drive, and you can easily buy USB drives from any electronic store. We recommend you get one that has storage more than your computer, so you have room for complete or multiple backups.
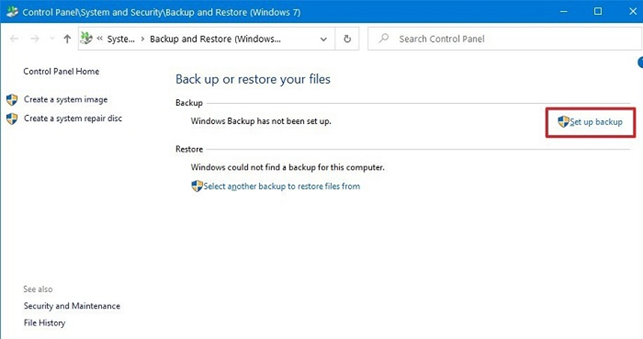
1. Once you connect USB to PC, you may be asked, if you want to utilize it as a backup. Confirm it by clicking on the prompt. If you don’t see this prompt, search for “backup” in the Start Menu and then pick Backup and Restore.
2. From the following page, click the “Set up Backup” button. Choose the external hard drive you plugged in and hit next. Follow the on-screen prompt and go ahead.
3. Finally, hit “Save Settings and Run Backup.” Now, Windows will start backing up to the connected drive. Make sure to keep your computer on during the backing up. From now, Windows will create regular backups in the background as you work.
To restore your files, just go to Start Menu, type in “Backup” and then click “Backup and Restore.” Click on “Restore My Files” or “Restore Users Files” button to retrieve your files.
How to Backup PC using File History to External Hard Drive
If you’re using Windows PC and want to take backup of your pc to external hard drive, then it’s easy to do using File History built-in feature. Windows File History schedule your backup and you can also manually back up your data to external hard drive. Here’s how to backup Windows.
Before you get started, get a backup drive. You can any use USB external hard drive, and you can easily buy USB drives from any electronic stores. We recommend you to get one that has storage more than your computer, so you have room for complete or multiple backups.
- When you connect USB for the first time, Windows will ask if you want to utilize it as a backup. Tell it you like it. If you don’t see this prompt, go to the Start Menu, search for “backup,” and then select Backup and Restore. Make sure you connected external hard drive to your pc before begin the process.
1. Tap the Windows Start button, go to Settings > Update & Security > Backup. Under Backup up using File History section, click Add a drive. Make sure your backup device is already connected.

2. Windows will display a list of all such locales. You can select the location where you want to save your backups.
- You can see that File history is now enabled.
Note: If File history yet not backing up any files, tap “More option” to set up a few parameters.
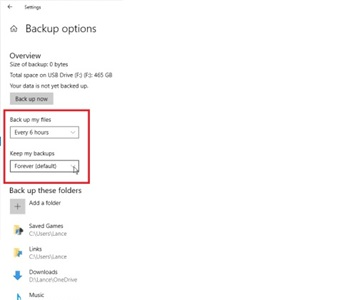
3. At the top of the File History Windows, tap the Back up my files drop-down menu and schedule your backup. Once you schedule your backup, tap the Keep my backups drop-down menu, and select how long you wish to keep backed up files-anything from Until space is needed to Forever.
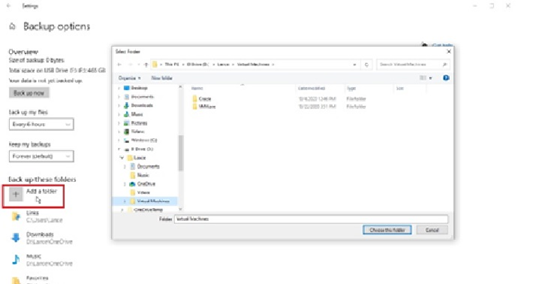
4. To add any specific file or folder into the default backup folder list, tap Add a folder button under the Back up these folder heading
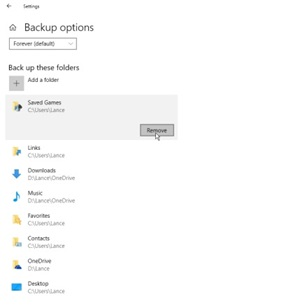
5. To remove any file or folder from default backup, just highlight the folder and click Remove button to exclude it.
6. Hit “Back up now” button at the top of the screen and Windows will start backing up these files included in your backup set. After your backup is complete, Windows displays the overall size as well as the backup’s date and time.
How to Backup Mac to External Hard Drive
You can back up your data on Mac to external hard drive using Time Machine. But before your start the process, make sure to format your hard drive for the MacOS extended file system. You can see that most hard drives are not pre-formatted for Macs.
Note: First of all, make sure your hard drive has proper space to back up your data. You can either erase the data or move your data over to another device before going ahead.
To format your drive,
- Connect the hard drive to your Mac.
- Open Applications > Utilities > Disk Utility
- Find your external hard drive in the list of drives.
- Click “Erase” from the Disk Utility options. Confirm the action.
- A Format pop-up window will give you the opportunity to choose one of the following:
a. Mac OS Extended (Journaled)
b. Mac OS Extended (Case-sensitive, Journaled)
c. Mac OS Extended (Journaled, Encrypted)
d. Journaled HFS Plus is used by the Mac OS Extended (Journaled) format to keep all of your data organized.
- Finally, rename the new drive. Under “Security Options” make sure to choose the drive to write over past data three times or more.
- Erase and Confirm.
Once you successfully formatted your drive, go ahead and use Time Machine to back up your data.
1. Go to System Preference in the dock and select Time Machine. Check “Back Up Automatically” checkbox on the left side of Time Machine Windows.
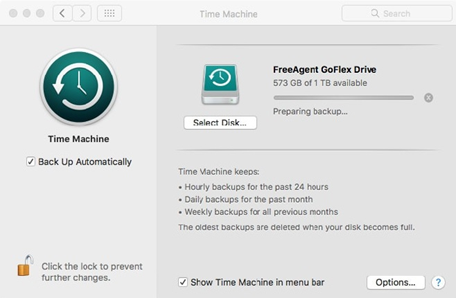
2. Under Select Disk, choose the drive for backing up your data. You’ll be prompted to enter the password for an encrypted drive if you did so.
3. Under the Options button, select the information you wish to back.
4. To add or remove the item from the default backup, click Add to add and Remove to exclude the information.
5. Once you’re done with the above step, go ahead. Time Machine now will automatically start backing up your data.
6. You can restore your data every 24 hours if something goes wrong. Additionally, you can restore data from any day in the past month and any weekly data since Time Machine started working.
Back Up Mac to External Hard Drive using Acronis True Image
You can also back up your Mac to external hard drive using Acronis True Image. Learn what you need to do.
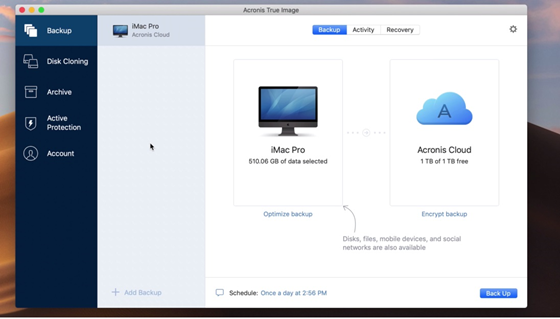
1. First of all, download and Install the Acronis True Image Software. Open the software and click Back Up.
Note: Acronis True Image 2020 enables a full Mac Backup by default.
2. Your complete Mac will be pre-selected for the backup. If you want, you can also specify a name for your backup.
3. Click on Backup destination and choose the external hard drive. Acronis True Image software also allows you to customize the scheduling, backup scheme, version controls, and other options simply by clicking the gear icon.
4. Finally, choose the destination for your backup, and click Backup and you’re done.
Special Tip:
Troubleshoot Storage Issue
While backing up PC or whenever you need to back up your PC, I am sure storage issue definitely encounters you always. To store your backup or troubleshooting storage issues, you can use Capebera Cloud Storage. Here you can store your backup for the lifelong and can access anytime-anywhere.
Summary
Hey guys! This was the guide about “how to backup PC to external hard drive.” If you want to back up your PC drive (Windows and Mac) to external hard then this guide will surely help you. We’ve discussed the two ways for each device so that if one method won’t work for you, you can try the second one.
Please let us know in the comment section if you’ve already backed up your PC to an external hard drive using any other method. We would love to hear about your experience.