
Want to share files on Windows? Find out few ways to share files on Windows easily.
Most Windows’ operating system version since 2006 has incorporated some different and improved features for sharing files between computers over a network. While the new features are strong, they can’t always be used when sharing with devices running older versions of Windows or non-windows devices.
Before You Start:
Capebera is an online platform that will help to deal with many problem discussed in this article. Create your free account and securely share file on Windows 10.
How to Share Files on Windows 10
You can share files on Windows 10 using various ways. Learn what you need to do.
Send files with Share
You can use the Share function, which is incorporated into File Explorer and other modern apps, to share one or more files with another user within your home network, office, or across the world only once.
To share the files on Windows 10 using Share Feature, follow the steps:
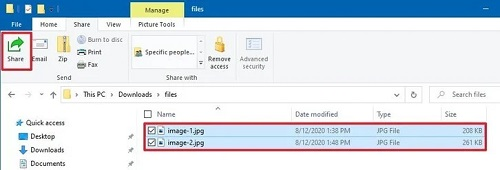
- Open File Explorer and search the files or folder you wish to send.
- Select the files and click on the Share tab.
- Alternatively, you can also right click on the file and choose the Share option in the context menu.
- Finally, hit the Share button.
- Now, choose the app contact, or nearby sharing device. Follow the on-screen instructions to share the content.
Note: Despite the fact that this is a sharing option, you are actually transmitting the data to another location. If you’re about to share files with a nearby device, keep in mind that “Nearby sharing” on both the source and destination machines must be enabled for it to operate properly. You can learn more about nearby sharing, in this guide.
Share Files in the Cloud With OneDrive
If you’re using Windows 10, you can also use OneDrive to share files or folder with family, friends, or colleagues. OneDrive allows you to share virtually any file by creating a secure link that others can use to access the content, which you can also revoke at any time.
To share files in the Cloud using OneDrive, follow the steps:
1. Open File Explorer on Windows 10. Click the OneDrive folder from the left pane.
2. Search the files or folder you wish to send. Select the files and click on the Share tab
3. If you don’t want that the receiver could edit the document, then uncheck the Allow editing option.
- If you have a Microsoft 365 subscription or OneDrive plan, you can also set the expiration date and password for the link.
4. Now, click Apply button. Type the email address of the person you want to share the file with. Or click the Copy link option to copy the link to the clipboard.
- If you want you can also add a personalized message for the share.
5. Finally, click Send button. Once you complete the steps, the recipient will get the link to access the shared file, and depending on the setting, the recipient will be able to view or edit the file.
Share Files with File Explorer
If you want to share multiple files in the local network, we recommend you to use the File Explorer Advanced sharing options.
Note: Always avoid sharing files from the system folders, including Desktop, Documents, Pictures, etc.
To create a basic folder share on Windows 10, use these steps:
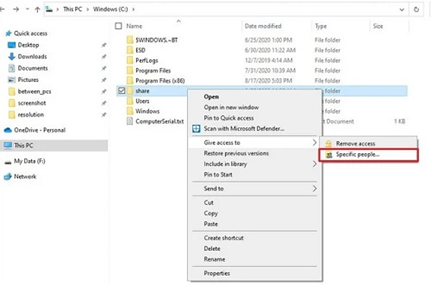
1. Open File Explorer and find the folder with the content that you wish to share.
2. Right click on the folder, and select the Give access to option, and click the Specific people option.
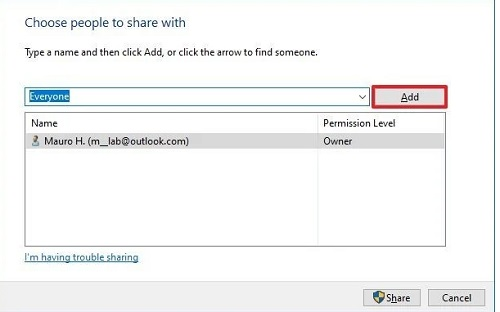
3. Use the drop-down option and select the user group to share the folder and its contents. You will find the following option here.
Local users
Individual accounts require the user to give a username and password in order to access the files. If the person logs in with the same credentials on their computer, they may be able to access the data without being prompted.
Everyone
Shares the contents with anyone in the network without entering a password to access the files.
Quick note
You could also see an option to create a new account, but this isn’t relevant because Windows 10 no longer permits you to do so through Control Panel.
4. Tap Add button and go to the “Permission Level” column. Under the “Permission Level” column, select the permissions that users will have to access the content. These permissions will decide what a counterpart user can do with the documents you would send him/her.
Read — Read option gives network allows user to list and open files, but they won’t be able to modify or delete existing files and folders. Also, they won’t be able to upload or create new folders or files.
Read/Write — Read/Write optionwill allow users to list, open, modify, delete, upload, and create new files and folders.
Remove —Remove option will blocks the specified user or group from accessing the folder.
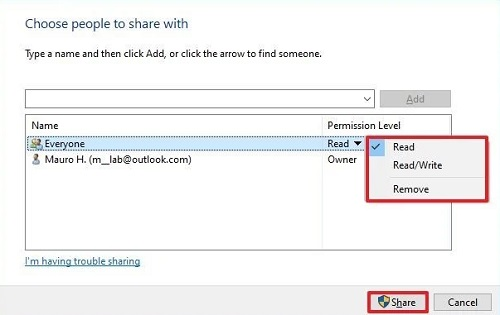
Note: You can select only one option at a time.
5. Once you complete the steps, you can share the link you copied on the clipboard on step no.8 with user in the local network.
6. Click Close button. Once you complete the steps, you can share the link which one you copied on the clipboard on step no.8 with user in the local network.
With this link, counterpart user can access the file, as per the permission you set for the counterpart user.
Home Network for Sharing With HomeGroup
HomeGroup was first introduced with Windows 7, HomeGroup allows for a local group of computers running Windows 7 or newer to associate with each other for sharing. Each local network can be set up with one homegroup that the computer connects by knowing the group’s name and password.
If a user wishes, the user can control the files and folder they wish to share with the Homegroup, and they can also share local printers. Microsoft recommends using HomeGroup for sharing on home networks unless some home PCs are running Windows XP or Windows Vista.
Note: HomeGroup has been removed from Windows 10 (Version 1803).
Summary
Hey guys! This was the guide about “File Sharing Windows 10.” File Sharing on Windows 10 is quite easy and possible with built-in options. However, you can also use third-party applications on Windows 10 for file sharing, but we do not recommend it. In this article, we have gathered a few ways to share files on Windows 10.
Hope you find this article helpful and informative. Please let us know in the comment section if you want a guide on Windows 10 file sharing third-party applications.