Secure all your files on computer on Windows 10 with backup plan.
Your computer does not promise you to secure your files, it’s you only who have to perform every security measure to secure your files on the computer. In every situation, backup is one of the most secure ways to get back all your data easily.
In this article, we explain how to backup Windows using the Windows system and how to restore a backup as well.
How to Backup Windows
If you’re running Windows 10, System Image Backup is an easy-to-use and versatile tool for producing a Windows 10 backup that’s ready to use right away. It’s a bit of a legacy tool that Microsoft no longer maintains, but it still works and, for the time being, is one of the best ways to build a Windows 10 image backup.
1. Go to Windows Settings
Press the Windows Key+I to open the Settings menu. Or, use the search bar and type Settings to open the Settings.
2. Update and Security
Under Settings, click Update and Security.
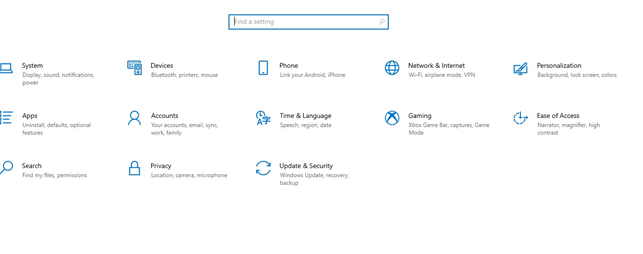
3. Backup
Now, under the Update and Security option, select Backup from the left-hand menu.
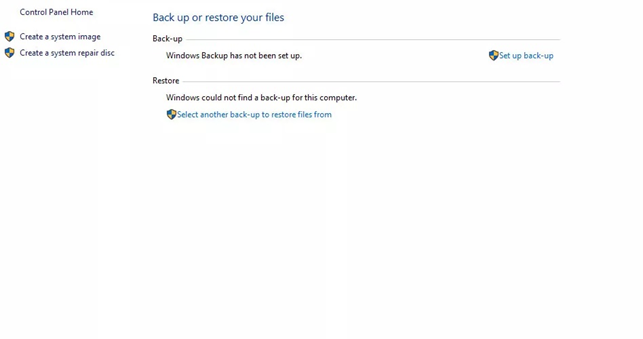
4. Backup and Restore
Now, under the heading Looking for an older backup? You need to select Go to Backup and Restore.
5. Create a system image.
Once you click on Backup and Restore, a new Control Panel Window will appear on the screen. On the left-hand side, select Create a System Image.
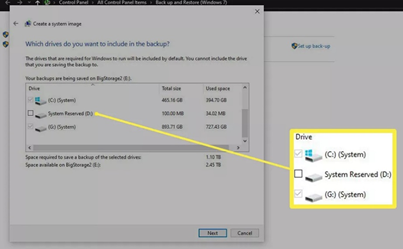
6. Save the Backup data
Once you’re done with the above step, a new Windows will open. Under Where do you want to save the backup, use the various toggles and drop-down menus to select whether you want to restore your image on a hard drive ( be it internal or external), or on a network connected drive , and then select Next.
Note: if you want to store your backup to an external drive, make sure it is connected before beginning this process.
Once you select the drive, check the relevant boxes and select Next.
7. Start backup
Select “Start backup” to begin the backup process. It may take some time depending on how large the installations are that you’re backing up and the speed of your drives. While backing up, you can continue to use your drives.
How to Restore a Backup on Windows 10
Once you’ve safely backed up your data you can easily restore your data in case you’ve lost or accidentally deleted it. Here’s how to restore a backup on Windows 10
1. First of all, connect your internal or external drive containing the system backup to your computer. Once you successfully connect it, you need to boot your computer.
2. Boot your Windows 10 and repeatedly press the F8 key to access the troubleshooting menu.

3. Select Troubleshoot >Advanced options >System Image Recovery>Windows 10 Now, on the Select a system image backup Windows, select the Use the latest available system image option.
Alternatively, if you’ve multiple backups, you can also manually select the system image instead.
4. Select Next>Next followed by Finish.
Now, the backup will begin and can take time depending on the size of your backup and speed of the drives involved. Once you’re data restored, however, you should be able to boot to your newly restored system as it was before.
How to Backup Windows 10 with File History
Windows File History feature makes you able to schedule your backup. And with this, you can even restore your data anytime. But to do so, you have to first set it up. Here’s how to set up File History and save your important documents, photos, and files before something goes wrong.
To begin the backup, make sure you have a viable drive connected to or accessible from your PC. Whether you use internal or external drive, or a network location on a Network Attached Storage drive, it should be perfectly connected to your pc. If you’re going to use wireless network drive, then it must be connected to power and properly mapped.
1. Once you’re with the above steps, go ahead on Windows 10. Tap the Start button, go to Settings > Update & Security > Backup.
2. Under Backup up using File History section, click Add a drive. Make sure your backup device is already connected.
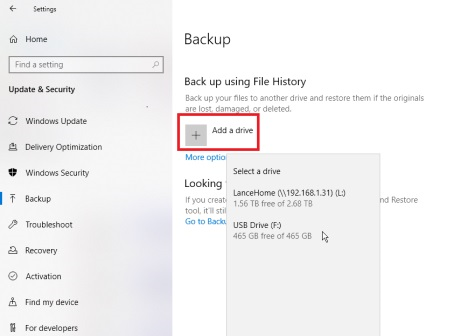
3. Windows will display a list of all such locales. You can select the location where you want to save your backups.
- You can see that File history is now enabled.
Note: If File history yet not backing up any files, tap “More option” to set up a few parameters.
4. Now, at the top of the File History Windows, tap the Back up my files drop-down menu and select how frequently you want to back up your files. You can select it on from minutes to hourly basis and to daily as well.
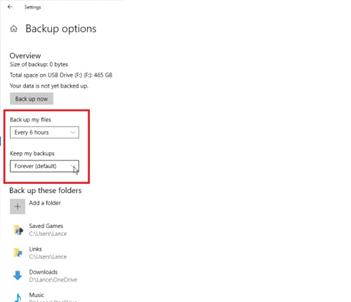
5. Once you schedule your backup, tap the Keep my backups drop-down menu, and select how long you wish to keep backed up files-anything from Until space is needed to Forever.
6. You can exclude any default backup folder that you don’t wish to backup and click Remove. Just scroll down the Backup options Window and select the folder you don’t wish to backup and tap Remove button to exclude it.

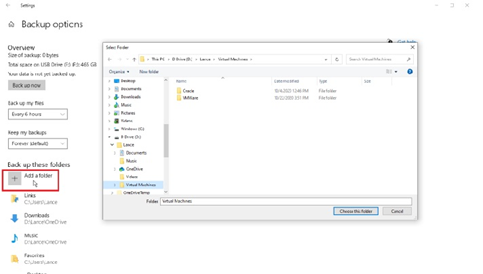
7. To add any specific folder to include into the default backup folder list, tap Add a folder button under the Back up these folder heading. From File Explorer, select any folder you want to add in the list.
8. Finally, tap the “Back up now” button at the top of the screen and Windows will start backing up these files included in your backup set. After your backup is complete, Windows displays the overall size as well as the backup’s date and time.
Tip:
To restore your data from File History, select Settings > Update & Security > Backup>More Options and click Restore files from a current backup link.
Bonus Tip
It’s good if you’ve backed up your data on daily basis on an external drive for security. But what if, you’ve lost the drive, or that drive will be damaged or crashed, then you might lose your data again without any backup. But don’t worry, because it yet not happened, it’s just an imagination. But you should take a step to so that you won’t lose your data again. We will tell you how?
First of all, make at least three copies of your data and store them on different places. Doing so will give you many option for backup, and it’s better to have more than one option rather than relying on only one.
- First copies of your file save on your original computer.
- Save another copy on a USB hard drive.
- And third copy you can save online on Capebera.com
Additionally, you can use 2 different types of media to back up the files, for example, backing up to both a hard drive and to optical media, like a DVD. This bonus tip is all about not saving all your data in one place.
Summary
Hey guys! This was the guide about “how to backup Windows.” Here we’ve discussed few ways to create a backup on Windows 10. Additionally, you can learn how to restore from these backups on a Windows computer. In the last section, we’ve covered up an excellent way to secure your data apart from backup option. We hope this guide will help you to understand how backup is important.
After reading this guide; whether you backed up your data or not, please let us know in the comment section.


![Best iPhone Photos Storage App [5 Free Apps 2021]](https://blog.capebera.com/wp-content/uploads/2021/10/Best-iPhone-Photos-Storage-App-5-Free-Apps-2021-958x575.png)