
Have you just moved to Mac? But don’t know how to move your files from one Mac to another Mac. There is a various way through you can transfer or share your files from one Mac to another Mac, or Mac to Windows. In this article, we will learn about Mac File Sharing, how to set up Mac file sharing, and a little more. Read on.
How to Share Mac File to Another
The first way you can share your files is using File Sharing. To use this feature, make sure you’ve already enabled it in the Sharing pane of System Preferences. To enable the File Share feature, follow the steps below:
How to Setup File Sharing on Mac
- Open System Preferences by selecting System Preferences from the Apple menu
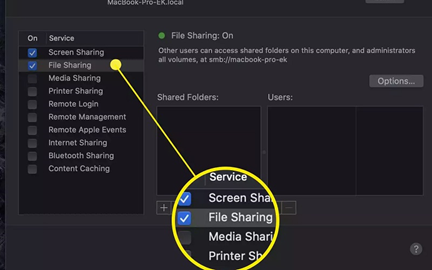
- Click the Sharing preference pane. The left side of the Sharing Preferences pane lists the services that you can share. Place a checkmark in the File Sharing box.
- Doing so will enable the AFP, the file-sharing protocol. Now, you can see a green dot indication that File Sharing On.
- Note down the IP address appearing below the text. Click on the Options button on the right of the text.
- Now, checkmark in the Share Files and Folders using SMB box as well as the Share Files and Folders using AFP box.
- Your Mac is ready to share files on Mac.
How to Share Files on Mac
Here few ways to share files on Mac:
File Sharing
Once you enabled the Share Files features on Mac, you’re ready for sharing. Make sure, if you want only want to share specific folders, or allows certain users to access them, add a folder to the Shared Folders list, and then select files and folders and add users in the Users list. If not, any user with an account can access your files.
- To share the files on Mac using Share File, make sure you’ve already added the user to the User list.
- Navigate to the files or folder you wish to share and select the User from the list.
- Your Files will be shared to the selected user.
To access another Mac’s Files in the Finder, select Go>Network. Double click one of the computers or devices that display, and enter your username and password. You can then only that Mac’s folder and files, and drag the files to and from that computer.
AirDrop
- AirDrop is also a good way to share files on mac. Here’s how to share files on Mac using AirDrop.
- First of all, open Finder, and choose Go>AirDrop on your Mac and counterpart user’s Mac as well.
- Now, drag a file onto the icon of the computer you wish to send a file to.
Note: AirDrop isn’t always reliable, and it does need to be active on both Macs, so you can’t easily copy files to a server or other computer.
Email works like a universal way to share files between. But, it’s also true that you cannot send large size files with emails. For example, Gmail allows you to send only 25 MB at a time.
If you have one or more small files that you need to share between Mac or Mac to Windows, you can send them as attachments to an email message.
What you need to send the files between the two systems:
- Just create a new message and address it to yourself, and then add the files.
- And if you want to send files to someone else, you just need to enter the email address of that person and then add the files and hit the Send icon.
- Ask the receiver to open the email client and download the message and its files. This is a good way to send files to a Mac that’s not currently running.
Dropbox
Dropbox is quite effective and more than files sharing app for Windows and Mac both as well. With the help of Dropbox, you can share files between Mac to Mac, or Mac to Windows, Windows to Mac, Windows to Mobile, Mac to iPhone, and many other ways.
However, shared files first stored in the Dropbox library, you may need to download them to check files on your system
- To transfer the files uploads the files or folder in Dropbox and let Dropbox create the link.
- Once the link is ready, copy the link and send them directly to the counterpart user through any way, like Email, Chatbox, Skype and the user can download the files from the link.
Share Files on Mac with Capebera
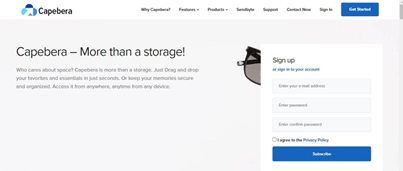
Using Web, you can easily send your files from Mac to another Mac or Windows. Capebera is web and cloud-based service. Here’s how to share files on Mac with Capebera.
Capebera isn’t a file-sharing website actually, it’s more than that. Let me tell you how, Capebera is a free unlimited storage platform, where you can drag and drop your files easily in the cloud and can access them from anywhere. Additionally, you can share those files with password encryption. So that no one, except whom you tell the password, can access your files. File sharing via the link will be encrypted with a password, and when a user tries to open the file, the user has to enter the password to access the files.
As Capebera is more than storage service, you can create the separate workspace for business and organize the works. Add team members, share the document and communicate easily your work. Moreover, with the help of shared links, users can download the files, edit them on their own. You can schedule the timing for the expiration of the link. Let me tell you, these all features are available for free, which means a completely free package. Compare to other services, you won’t get these all features and services in one tool for free. Visit: Capebera.com
How to Set Up Specific Folders to Share
Each Mac user account has a built-in Public folder the computer shares automatically. You can share other folders, as well as limit the access right for each of them.
Make sure the Sharing Preferences pane is still open, and File Sharing still selected in the left-hand pane.
To add the folders, tap the Plus button below the Shared Folders list. In the Finder, navigate to the files or folder you want to share. Click the folder to select it, and then, click the Add button.
You just need to repeat the above steps for any additional folders you wish to share.

Specify the Access You Want
You can also set restrict the files or folders you’ve shared. For example, the current of folder has read and write access; everyone else is limited to read access. If you to change the access rights, learn how you can change the default access rights by performing the following steps.
Note: You can specify the access limits with each folder.
1. First of all, select the folder in the list of Shared Folders. The Users list will display the names of the users who have access rights. Next to each user’s name is a menu of available access rights.
2. Now, add a user to the list by tapping on the Plus (+) icon below the Users list.
3. A drop-down sheet will display a list of the Users & Group on your Mac. The list included individual users as well as groups, such as administrators.
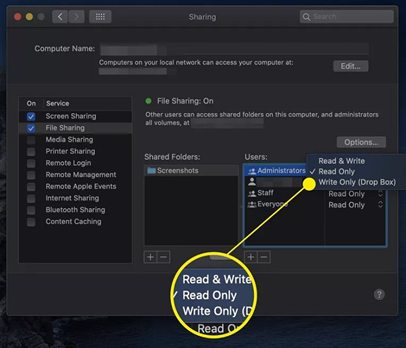
4. Tap the name in the list, and then you need to click on Select button. To change the access for a user or group, click on the same user name in the Users list, and then tap the current access rights for that user or group.
Read & Write– This access defines that user can read the files, edit the files, create new files and delete the files as well from the shared folder.
Read Only– This access defines that user can only read the files. User cannot edit the files, create new files and delete the files from the shared folder.
Write Only– This access defines that user can copy files to drop box, but won’t be able to see or access the contents of the drop-box folder.
No Access – This access defines that user will not be able to access any files in the shared folder or any information about the shared folder.
Select the type of access you wish to allow for particular user and repeat these steps for each shared folder and user.
Summary
Hey guys! This was the guide about “Mac File Sharing.” Here we’ve discussed few easy ways to share files on Mac. Most of the listed option allows you to share files from Mac to Mac, Mac to Windows and More. Read the complete article and share your files securely.
Hope you find this article helpful and informative. If you’ve any query regarding this article, please let us know in the comment section. We would love to hear from you.