Backing up pictures to iCloud is simple and quick. It’s good to back up pictures to iCloud as iCloud creates and stores your backup online and wirelessly. To create backups and restore, you just need Apple ID, and you can easily create and restore your backups easily on any device and from anywhere.
iCloud directly not back up your pictures. The Photos app along with iCloud Photo Library will allow you to store all of your photos in the Cloud. You can upgrade your iCloud storage space to accommodate your iCloud Photo Library. You can upload your pictures to iCloud Photo Library via iCloud.com.
Every user gets 5GB of free iCloud storage from Apple out of the box. This storage can be used to back up apps, photos, videos, and documents. However, 5GB quickly fills up; additional storage starts at $0.99 per month for 50GB in the United States. You can also bundle iCloud storage with other Apple services such as Apple Music, Apple TV+, Fitness+, and more with Apple One.
Before You Back Up:
Make sure you’re device running iOS 8.1 or later use iCloud Photo Library. In earlier versions, you may find the iPhoto app or Aperture for backing up your pictures. To use the iCloud Photo Library, you have to enable the iCloud Photo Library by turning it on from your iOS device.
1. Open the Settings app and tap on your name at the top of the Settings, and then tap iCloud.
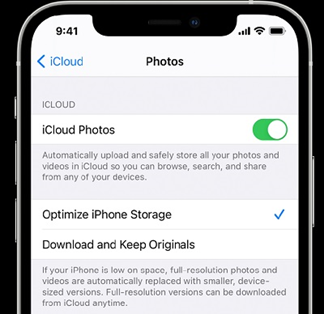
2. Select Photos, then switch on the iCloud Photos option. When you first activate the iCloud Photo Library, you’ll see a progress bar telling you how many photos have been uploaded to iCloud.
Turning on iCloud Photo Library will automatically upload and store your entire library in iCloud to access photos and videos from all of your devices. If you previously have photos synced from iTunes they will be removed, and there will be a prompt alerting you of this.
If you want to use iCloud Photo Library on multiple devices, follow the same process on each device. When the photos are uploaded into iCloud, this will only occur while connected to Wi-Fi to avoid high data usage.
When you enable the iCloud Photo Library, you have two different option as to how the photos are handled and stored.
- Optimize iPhone/iPad Storage
- Download and Keep Originals.
If you go with the first option, Optimize iPhone/iPad Storage, iCloud will reduce the file size of the pictures on the device and keep the full resolution version of the picture in iCloud.
If you choose the second option Download and Keep Originals, this will keep the full resolution version of the picture in iCloud and locally on the device.
How to Backup Pictures on iPhone with iCloud
Once you turned-on iCloud Photo Library and set up the option iCloud gives you in the above step, you’re ready to back up your pictures on iCloud.
As we know, iCloud backup your data wirelessly, so you don’t need to use any USB cable. To use this, you’ll need to sign in with an Apple ID. If you don’t have one yet, you need to create one first, only then you can use the iCloud service.
Note: Go to the next section in this article to sign into iCloud account.
Here’s how to back up pictures to iCloud:
- First of all, open the iPhone “Setting and tap Your Name and then select iCloud.”
- Note: In case, you don’t see your name after open the settings that means you’re not signed in to an iCloud account. So, to see this option, first sign in to iCloud account.
- Once you’re on iCloud screen, tap Photos>Turn on iCloud Photos.
Remember, iCloud provides 5GB storage for free, so before you backup your pictures make sure to organize your photo library by deleting unnecessary snaps, repeated photos and etc.
How to Create an Apple ID
You can create Apple ID on two conditions when you first set up your device, or you can set it up later in the App Store. Here’s how to create Apple ID.
When you first set up your device:
1. First of all, click on “Forgot password or don’t have an Apple ID?”
2. Click “Create a Free Apple ID.”
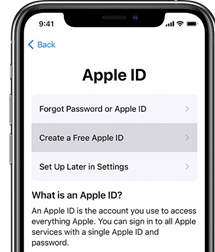
3. You will be asked to enter your birth date and your name. Click Next.
4. You can choose to create your Apple ID with the current email address or if you don’t have one, you can get iCloud free email address. Click “User your current email address,” or click “Get a free iCloud email address.” The email address you provide will be your new Apple ID. Go ahead and follow the on-screen prompts.
5. You will be asked to verify your email address and set up two-factor authentication. You can skip this step, but you’ll be prompted to do this later in Settings.
Set it up later in the App Store
1. First of all, open the App Store and click on the Sign-in button.
2. Click on “Create New Apple ID.” If you don’t see this option, make sure you’re signed out of iCloud.
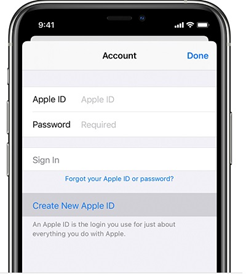
3. Follow the on-screen steps. The email address you provide will be your new Apple ID.
4. Enter your credit card and billing information, and then Click Next. If you don’t want to provide these information’s, you can also choose none.
5. You will be asked to confirm your phone number. This can help to verify your identity and recover your account if needed. Click Next.
6. Check your email for a verification email from Apple and Verify your email address. Once you verify your email address, you can use your Apple ID to sign in to the iCloud, iTunes, and other Apple Services.
How to Sign in to iCloud
Once you’ve created your Apple ID or if you already have an Apple ID, you can go ahead and sign into your iCloud account.
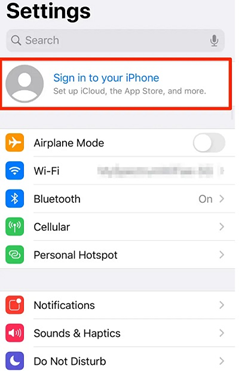
- Open your iPhone’s setting app. At the top, click on the blue text reading, “Sign in to your iPhone.”
Note: If you’re already signed in to iCloud, your name and information will appear here.
- Sign in with your Apple ID. Your username will be an email address.
- You will see a blank screen with the text ‘Signing into iCloud.” It may take several minutes.
- If you’ve created a passcode on your device, you’ll be asked to enter your iPhone’s four-digit passcode.
- When you successfully signed in, you will see your name at the top of the Settings app.
How to Restore Pictures from iCloud Photo Library
When you enable iCloud Photo Library and connect to the internet, your iPad or iPhone will automatically upload photos and videos to your iCloud account. Your pictures can then be accessible via iCloud from other Apple devices or the web. Follow the steps to manually perform this:
First of all, turn on your iOS or iPadOS device. From the App & Data screen, click Restore from iCloud Backup, and when prompted, sign in with your Apple ID
Select “Choose Backup,” and then choose from list of available backups in iCloud.
If you want to transfer or access your pictures on other iOS devices, the process is very simple. The pictures on your iCloud account, after backup, should be identical to those on your iPhone. So, you can access those pictures on any device just by logging in to your iCloud account with the same Apple ID you used to create your backups on the primary device.
Summary
Hey guys! This was the guide about “How to backup pictures to iCloud.” Backing up pictures is quite easy on iCloud, but make sure you already set up your iCloud account. In this article, we’ve discussed the complete process to turn on and back up iCloud Photo Library that stores backups. Additionally, you will learn the complete process and requirements to set up an iCloud account, especially for those who just buy the new iOS device.
Hope you find this article helpful and informative. Please let us know if you find any difficulty while backing up pictures or sign in to your iCloud account.


![Best iPhone Photos Storage App [5 Free Apps 2021]](https://blog.capebera.com/wp-content/uploads/2021/10/Best-iPhone-Photos-Storage-App-5-Free-Apps-2021-958x575.png)