
Backing up is good and really important and when it comes to your pictures, you surely don’t want to take a chance of losing your pictures. You can use more than one way to secure your pictures on a device like backing up your pictures and then transfer the same on the computer and encrypt them. Your computer has a vast storage space, so you can store as many pictures as you want.
In this article, we will understand how to backup iPhone pictures to computer and how to transfer pictures from iPhone to Computer.
How to Backup iPhone Pictures with iTunes
iTunes make the complete backup of your computer and can sync with any portable device easily. You can make use of this jukebox player on both Windows and Mac operating system. So, let’s discuss the steps on how to backup iPhone pictures to computer Windows.
Before you start, make sure you’ve upgraded your iTunes version to 12.5.1 or later.
First of all, if you’ve multiple folders of image, organize the folder of photos on the iPhone. You can also combine the different subfolders into one large folder for ease of transfer.
- Now, you need to connect your iPhone with PC using a USB cable and unlock your iPhone. When prompted: click Trust This Computer.
- Open iTunes and click on the iPhone device’s icon. Then, hit the Photos tab under the section to check the Sync Photos box.
- Select the folder or app from which you want to sync photos. Select syncing all photos and selected albums.
- Finally, click Apply. Your backup may take time depending on the count of pictures you’re backing up.

How to Backup Pictures with iCloud
Make sure you’re device running iOS 8.1 or later use iCloud Photo Library.
Here’s how to back up pictures to iCloud:
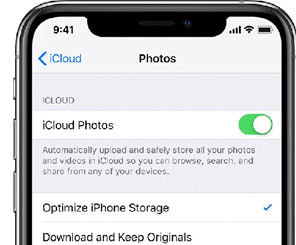
- First of all, open the iPhone “Setting and tap Your Name and then select iCloud.”
- Note: In case, you don’t see your name after open the settings that means you’re not signed in to an iCloud account. So, to see this option, first sign in to iCloud account.
- Once you’re on iCloud screen, tap Photos>Turn on iCloud Photos.
Remember, iCloud provides 5GB storage for free, so before you backup your pictures make sure to organize your photo library by deleting unnecessary snaps, repeated photos and etc.
How to Backup iPhone Pictures to Computer with Photos App
How to Backup iPhone Pictures to Computer with Photos App
You can also use Windows 10 Photos App to transfer all the iPhone pictures to the PC. Here’s how to backup iPhone pictures to the computer.
- First of all, connect your iPhone with a PC using the USB cable. Once it connects, go ahead.
- Go to the Start menu and type Photos and open it. On the Photos app select Import in the top-right corner.
- All the photos will get selected by default, so choose them not to import. Doing so will help you to choose the selected pictures to transfer.
- Finally, once you select the pictures you want to transfer, select Continue and go ahead. Make sure not to unplug the iPhone during the process.

How to Backup iPhone Pictures to Computer
Some users face lots of bugs with Photos app, so here another way to backup iPhone pictures to the computer. OR, we can say how you can transfer backup pictures to the computer.
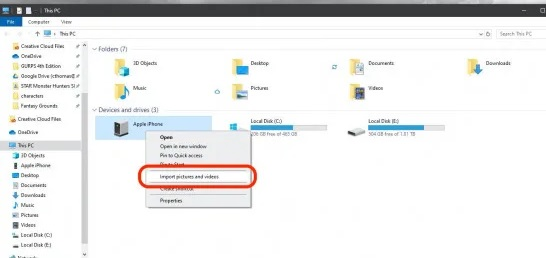
- First of all, plug your iPhone into your computer with the cable and unlock your iPhone. When prompted, click Allow.
- On your Windows computer navigate to This PC. You should see your iPhone listed under Devices and Drives.
- Now, right click on your iPhone and in the Context menu select Import pictures and videos.
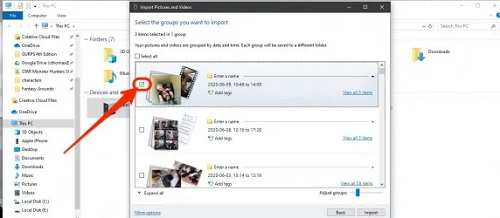
Here, you will have few options to choose.
- Import all new items
- Review photos
- Organize and group items to import
4. If you want, you can select either option. But, we recommend you to select to Review because the automatic option may clutter your gallery on computer and also store the unnecessary pictures as well.
5. If you want, you can select More Option at the bottom. It offers the option to change where the files are saved. Click Next and the computer will scan your iPhone for images and videos.
6. Now, select the Pictures you wish to Import. A slider at the bottom of the menu changes how the images are grouped into Folder, e.g. by the hour, by hours, by day, by month, or by year taken. You can slide it all the way to the right get them all in one folder.
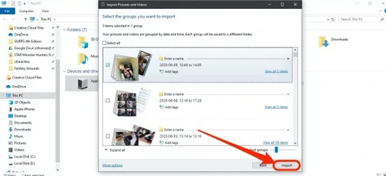
7. Finally, hit Import, when you satisfied. Pictures will start transferring from iPhone to Computer.
How to Backup iPhone Pictures to Mac
You can backup your iPhone pictures to Mac using Photo Stream as well. If you’re already using Photo Stream then you would know that Photo Stream does not take up any of your iCloud Storage package. However, it’s also true that pictures will appear in Photo Stream for only 30 days.
With Photo Stream, Photos will automatically import when your device is in a Wi-Fi zone unless you have enabled the option to transfer over cellular. To set up Photo Stream, you’ll need to enable it on both your iPhone or iPad and computer.
Note: Photo Stream also doesn’t upload your videos, but you can view your pictures across your devices easily
How to Backup iPhone Pictures on Mac:
- Open the Setting app on your iPhone and click on your Name at the top of the setting page.
- Click iCloud>Photos> Toggle on Upload to My Photo Stream.
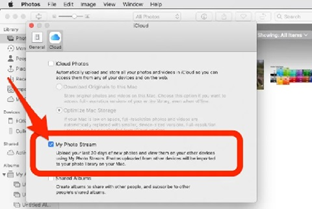
- Now, go to your Mac and open the Photos App. From the Photos menu, choose Preferences.
- Choose the iCloud tab and chose the box next to My Photo Stream.
- Note: if you’re MacOS Mojave and earlier version, the same setting is found in System Preferences>iCloud> Options button next to Photos.
- Now, you will see that your pictures will automatically be added to Photo Stream. Make sure you’re Wi-Fi is active.
Note: Pictures remain in Photos Stream only for 30 days or up to 1000 images.
How to Backup iPhone Pictures to Computer with Capebera
Capebera is an online solution for backup problems. It’s a cloud-based service that stores your backups into Cloud and travels with your everywhere so that you can access whatever you’ve stored in Capebera. So, here’s how to backup iPhone pictures to a computer with Capebera.
How to backup pictures with Capebera:
1. First of all, connect your iPhone and Computer using a cable and unlock your iPhone. When prompted, click Allow.
2. On you Windows computer navigate to This PC. You should see your iPhone listed under Devices and Drives.
3. .Now, visit Capebera.com on web and create your account using your email id and password, if haven’t created it yet.
4. Now, click on the Upload or Files icon. Doing so will take you to the File Manager.
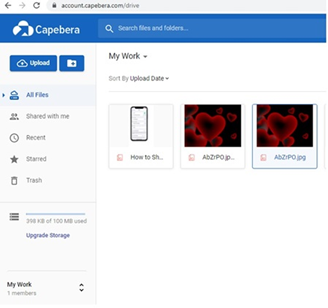
5 .Now, click on your iPhone under This PC section. Your Phone gallery will be open. From here, go to the folder where you’ve stored the pictures you wish to backup. Select the pictures you want to upload.
6. Click Open and your pictures will start uploading. It may take time depending on the count of pictures you want to upload.
Capebera is a cloud storage service. So, all your uploads will be online and you can now access uploaded pictures from anywhere and from any device.
Additionally, you can also move the items from Capebera to your Drive, while the original one retain in Capebera.
Summary
Hey guys! This was the guide about “how to backup iPhone pictures to computer.” Backing up iPhone pictures to the computer is as same transferring your pictures to the computer. And if you are clear about what you want to do, this guide would help you surely. Find out few ways to backup iPhone pictures to your computer (Windows or Mac). Hope you find this article helpful and informative. Please let us know in the comment section, which method you have used to back up your pictures?